Kedify Predictive Scaler
The Kedify Predictive Scaler enables KEDA to scale using internal ML model that was trained on historical data. The model is able to recognize repeating seasonal patterns (such as off-hours periods, weekends, holidays) and give predictions.
Details
Section titled “Details”In order to be able to forecast metric data, we need the measurements from the history. There are currently several methods how to get the metric data for the model. These methods can be also combined and used together.
- listen on a real metric data incoming from a different scaler
- listen on a real metric data incoming from a OTel ecosystem using OTLP receiver
- use a CSV file (url given to
metric-predictorcomponent)
Configuring the metric source as well as tuning the hyper parameters of the model can be done in
a new Kubernetes Custom Resource Definition (CRD) called MetricPredictor (shortly mp).
The instances of MetricPredictor (mp) CRDs are then reconciled by a new controller called kedify-predictor. This component is responsible for creating and maintaining gRPC connections to
keda-operator where it can hook to an existing metric source and use these measurements to feed the data for the future model training.
One instance of mp corresponds to one machine learning model and at most one metric subscription to KEDA. The kedify-predictor controller is agnostic of ML model type. The referential implementation uses Prophet, but it defines an API for ingestion, training and predicting so that more implementations may be plugged in.
Architecture
Section titled “Architecture”
Microservice that can host multiple Prophet models (on the diagram called ModelsImpl) is by default delivered together with the controller as a side-car container.
Installation
Section titled “Installation”Kedify Predictor can be installed using a publicly available Helm Chart. Please consult the installation page for more details. By default, for training the models the predictor spawns Kubernetes jobs that can write to a common persistent volume. There is one volume for serialized models and one for SQLite (file-based) DB where metrics and model configuration parameters are stored.
However, if your cloud provider platform doesn’t allow for shared PVs where multiple pods can read and write, you may want to configure the Predictor to run with an external database (Postgres instead of SQLite) and avoid the shared PVs altogether.
Metric Predictor Specification
Section titled “Metric Predictor Specification”apiVersion: keda.kedify.io/v1alpha1kind: MetricPredictormetadata: name: e-shop namespace: appspec: model: type: Prophet defaultHorizon: 2m lookBackPeriod: 1y retrainInterval: 1w changepointPriorScale: 0.1 holidays: countryCode: JP strength: 6.5 seasonality: mode: additive daily: "auto" weekly: "auto" yearly: "false" custom: name: monthly period: 1mo fourierOrder: 20 source: keda: kind: scaledobject name: e-shop-nginx triggerName: http-requests # the 'e-shop-nginx' SO must have a named trigger called 'http-requests' active: true oneShotCsv: url: https://storage.googleapis.com/kedify-predictor/website_traffic_4weeks_30s.csv timestampColumnName: ds # name of the timestamp column valueColumnName: "y" # Name of column that contains the measured values in the referenced CSV file timestampPeriod: 30s # spacing between two data points when addTimestamps is true active: true retention: 1y # during retrain of the model, drop data older than this from the databaseThis mp contains two sources: oneShotCsv as well as the live metric source defined by the "e-shop-nginx" ScaledObject (in trigger http-requests).
Parameter list:
Section titled “Parameter list:”for model:
defaultHorizon: If not specified on the trigger level, this is the horizon the model will be forecasting forname(optional): Explicit name of the ML model. Default:${ns}*${name_of_mp_resource}lookBackPeriod(optional): Portion of historical data that should be used for retraining (0 or missing - all)retrainIntervalHow often the retrain should be runchangepointPriorScale(optional): model can detect drifts in data. Large value here allows for more flexibility of the model to find those changing points in data distributionoperationOverTime(optional): Defines the time-series operation over the specified time window. See Operation Over Time for more details.holidays.countryCode(optional): ISO 3166-1 alpha-2 country codeholidays.strength: Parameter (float) modulating the strength of the holiday components model. Default:10seasonality.mode(optional): Can beadditiveormultiplicativeAre measurements getting bigger and bigger (or smaller and smaller) during time? If yes, usemultiplicative. Most of the time, leave the default here.seasonality.daily(optional): Can be'auto'(default),'true','false', or a number of Fourier terms to generate (all passed as string).seasonality.weekly: Same option for weekly seasonality.seasonality.yearly: Same option for weekly seasonality.seasonality.custom.name: Name of the custom seasonality. It will be visualized in the component graph under this name.seasonality.custom.period: custom time period in which a patterns should be found. If you expect repeating pattern in your data, set the repeat period here. It can be also captured by the longer season, but model will work better if we give it a hint. By default, we create for each model also six-hour implicit seasonality.seasonality.custom.fourierOrder: Number of components of Fourier series approximation ~ “resolution” of the auto-regressive function for this seasonal component. Higher values can capture more sophisticated patterns, but can also lead to over-fitting and prolongs the training. This value has the same semantics asseasonality.{daily,weekly,yearly}(if the number was used) Default:16
for metric source:
-
KEDA (live metric data streamed from an existing KEDA scaler)
keda.kind(optional):scaledobjectXORscaledjobDefault:scaledobjectkeda.nameEither name of thescaledobjectorscaledjobbased on the previous optionkeda.triggerNameName of the existing trigger defined by the above-mentionedScaled{Object,Job}. This way we can subscribe to any existing scaler in KEDA vast ecosystem or even use the OTel Scaler and plug any arbitrary metric you have.keda.active(optional): Iffalsethe metric subscription is paused and model will not be obtaining the live data from the existing scaler. DefaulttrueoneShotCsv.url: Url that points to a CSV file that should be used to bootstrap the model with initial metric data. It is assumed that first line of the file contains header with column names and CSV contains columns called ‘ds’ and ‘y’. If not, useoneShotCsv.timestampColumnNameandvalueColumnNameto select some other columns; oraddTimestampsif column with up-to-date timestamps should be created.
-
OTel (live metric data streamed using OTLP protocol to predictor)
-
otel.metricName: Name of the metric whose values should be recorded for the model. Example:http_requests_total. -
otel.metricType(optional): One ofgauge,sum,histogram,exponentialhistogram,summaryDefault:gauge -
otel.requiredLabelsOnly metric having all these labels is recorded this way you can further restrict the values pertaining to the model all the unspecified labels are then considered as matching.Example:
metricName: http_requests_totalrequiredLabels:handler: /apiapp: myserver -
otel.active(optional): Iffalsethe metric subscription is paused and model will not be obtaining the incoming live data from the OTLP listener. Defaulttrue
-
-
CSV (one-shot CSV file)
oneShotCsv.addTimestamps(optional): if the CSV does not contain timestamp column or if the timestamps are too old, we can fill it. DefaultfalseoneShotCsv.timestampColumnName(optional): Name of column that contains timestamps in the referenced CSV file. IfaddTimestampsis enabled, this will be ignored. Default:'ds'oneShotCsv.valueColumnName(optional): Name of column that contains the measured values in the referenced CSV file, Default:'y'oneShotCsv.timestampPeriod(optional): IfaddTimestampsis true, what should be the time delta between the two samples. The timestamp will be calculated so that last data sample in the CSV file represents thetime.now()and the very first one will have timestamptime.now() - number_of_samples*timestampPeriod. Default:'30s'
Trigger Specification
Section titled “Trigger Specification”The MetricPredictor custom resource makes sure the model can get its metric data and can be periodically trained. However, if we want to actually use the model for prediction, one has to reference it from a Kedify predictive scaler as one of the triggers.
triggers: - name: valueFromTheFuture type: kedify-predictive metadata: modelName: app*e-shop horizon: 15m modelMapeThreshold: "80" estimateType: upper-estimate targetValue: "10"Parameter list:
Section titled “Parameter list:”modelName: This name must match the model name created bympresource (implicitly${namespace}*${name-of-mp})horizon(optional): Prediction horizon - what will be the estimated value in time"now+horizon"? Example:150sDefault: if not specified, default frommpdefinition is usedmodelMapeThreshold(optional): When training the model, we split the metric data into train and test sets and evaluated the model on the test set. Evaluation is done by calculating the Mean Average Percentage Error (MAPE) error. If the model is not performing well or in other words, if his MAPE score is above this threshold, we return thehighMapeDefaultReturnValueso that we can use this from scaling modifier to ignore it. The lower the value, the higher precision of evaluations. Default40highMapeDefaultReturnValue(optional): This is the default value returned when model is not performing well or has not been trained yet. Default0estimateType(optional): ML Model returns the estimated value but also upper and lower bounds. Allowed values:upper-estimate, lower-estimate, the-estimateDefault:the-estimatehttpMethod(optional): What HTTP method should be used when asking a model for prediction. Allowed values:GET, POST. DefaultGETurl(optional): What URL should be used when asking a model for prediction. Allowed values:GET, POST. Defaulthttp://kedify-predictor.keda.svc:8000/models/{modelName}/predict?horizon={horizon}valueLocation(optional): JSON path that should be used for obtaining the predicted value from the HTTP request (without the leading dot). Default: based on theestimateTypevalue -forecast.0.yhatorforecast.0.yhat_{lower,upper}unsafeSsl & authOptions: Same set of configuration options as described for metrics-api scaler.targetValue: Common configuration option for all KEDA scalersactivationTargetValue(optional): If predicted value is below this threshold the scaler will be considered as not active. Used for 0-1 scaling. Default0
Example ScaledObject with Predictive & HTTP triggers
Section titled “Example ScaledObject with Predictive & HTTP triggers”This full example of a scaled object has two triggers and it uses both values, the real one and the predicted one in two minutes (the default taken from the associated MetricPredictor). Using those two values it calculate the mean and use it for scaling. With scaling modifiers life is your oyster.
kind: ScaledObject  metadata:    name: e-shop    namespace: app  spec:    scaleTargetRef:      name: e-shop
    triggers:    - name: predictedRequestsInTwoMins      type: kedify-predictive      metadata:        modelName: app*e-shop        targetValue: "10"    - name: requests      type: kedify-http      metadata:        hosts: www.example.com        service: e-shop-service        port: "8080"        scalingMetric: requestRate        targetValue: "10"
    advanced:      scalingModifiers:        formula: (requests + predictedRequestsInTwoMins)/2        metricType: AverageValue        target: "10"
Model Retraining
Section titled “Model Retraining”Retraining the model for each new datapoint would be way too expensive, especially in KEDA ecosystem, where we get the value, each 30s. Instead, we expose a configurable period under mp.spec.model.retrainInterval denoting how often the model should be fully retrained.
The time of the last retrain action is then captured under mp.status.conditions. It is also possible to trigger the retraining explicitly by annotating the MetricPredictor resource:
kubectl annotate mp e-shop synthetic --overwrite kedify.io/retrain=trueTo check the status of the MetricPredictor one can inspect the resource by:
kubectl get mp e-shop -owideNAMESPACE NAME LASTRETRAIN MODELNAME READY SOURCE SOURCEKIND SOURCEDETAIL AGE STATE RETRAININTERVAL CSVapp. e-shop 12m app*e-shop True KEDA,CSV scaledobject:e-shop trigger: mm 30m Subscribed 8760h0m0s IngestionOkModel Explainability
Section titled “Model Explainability”In the current implementation of Kedify predictor uses Prophet as the ML technique. It has a built-in feature for visualizing the model prediction that is also exposed to Kedify users.
Kedify Dashboard
Section titled “Kedify Dashboard”Information about the model can be inspected in the Kedify Dashboard for the respective MetricPredictor resource:
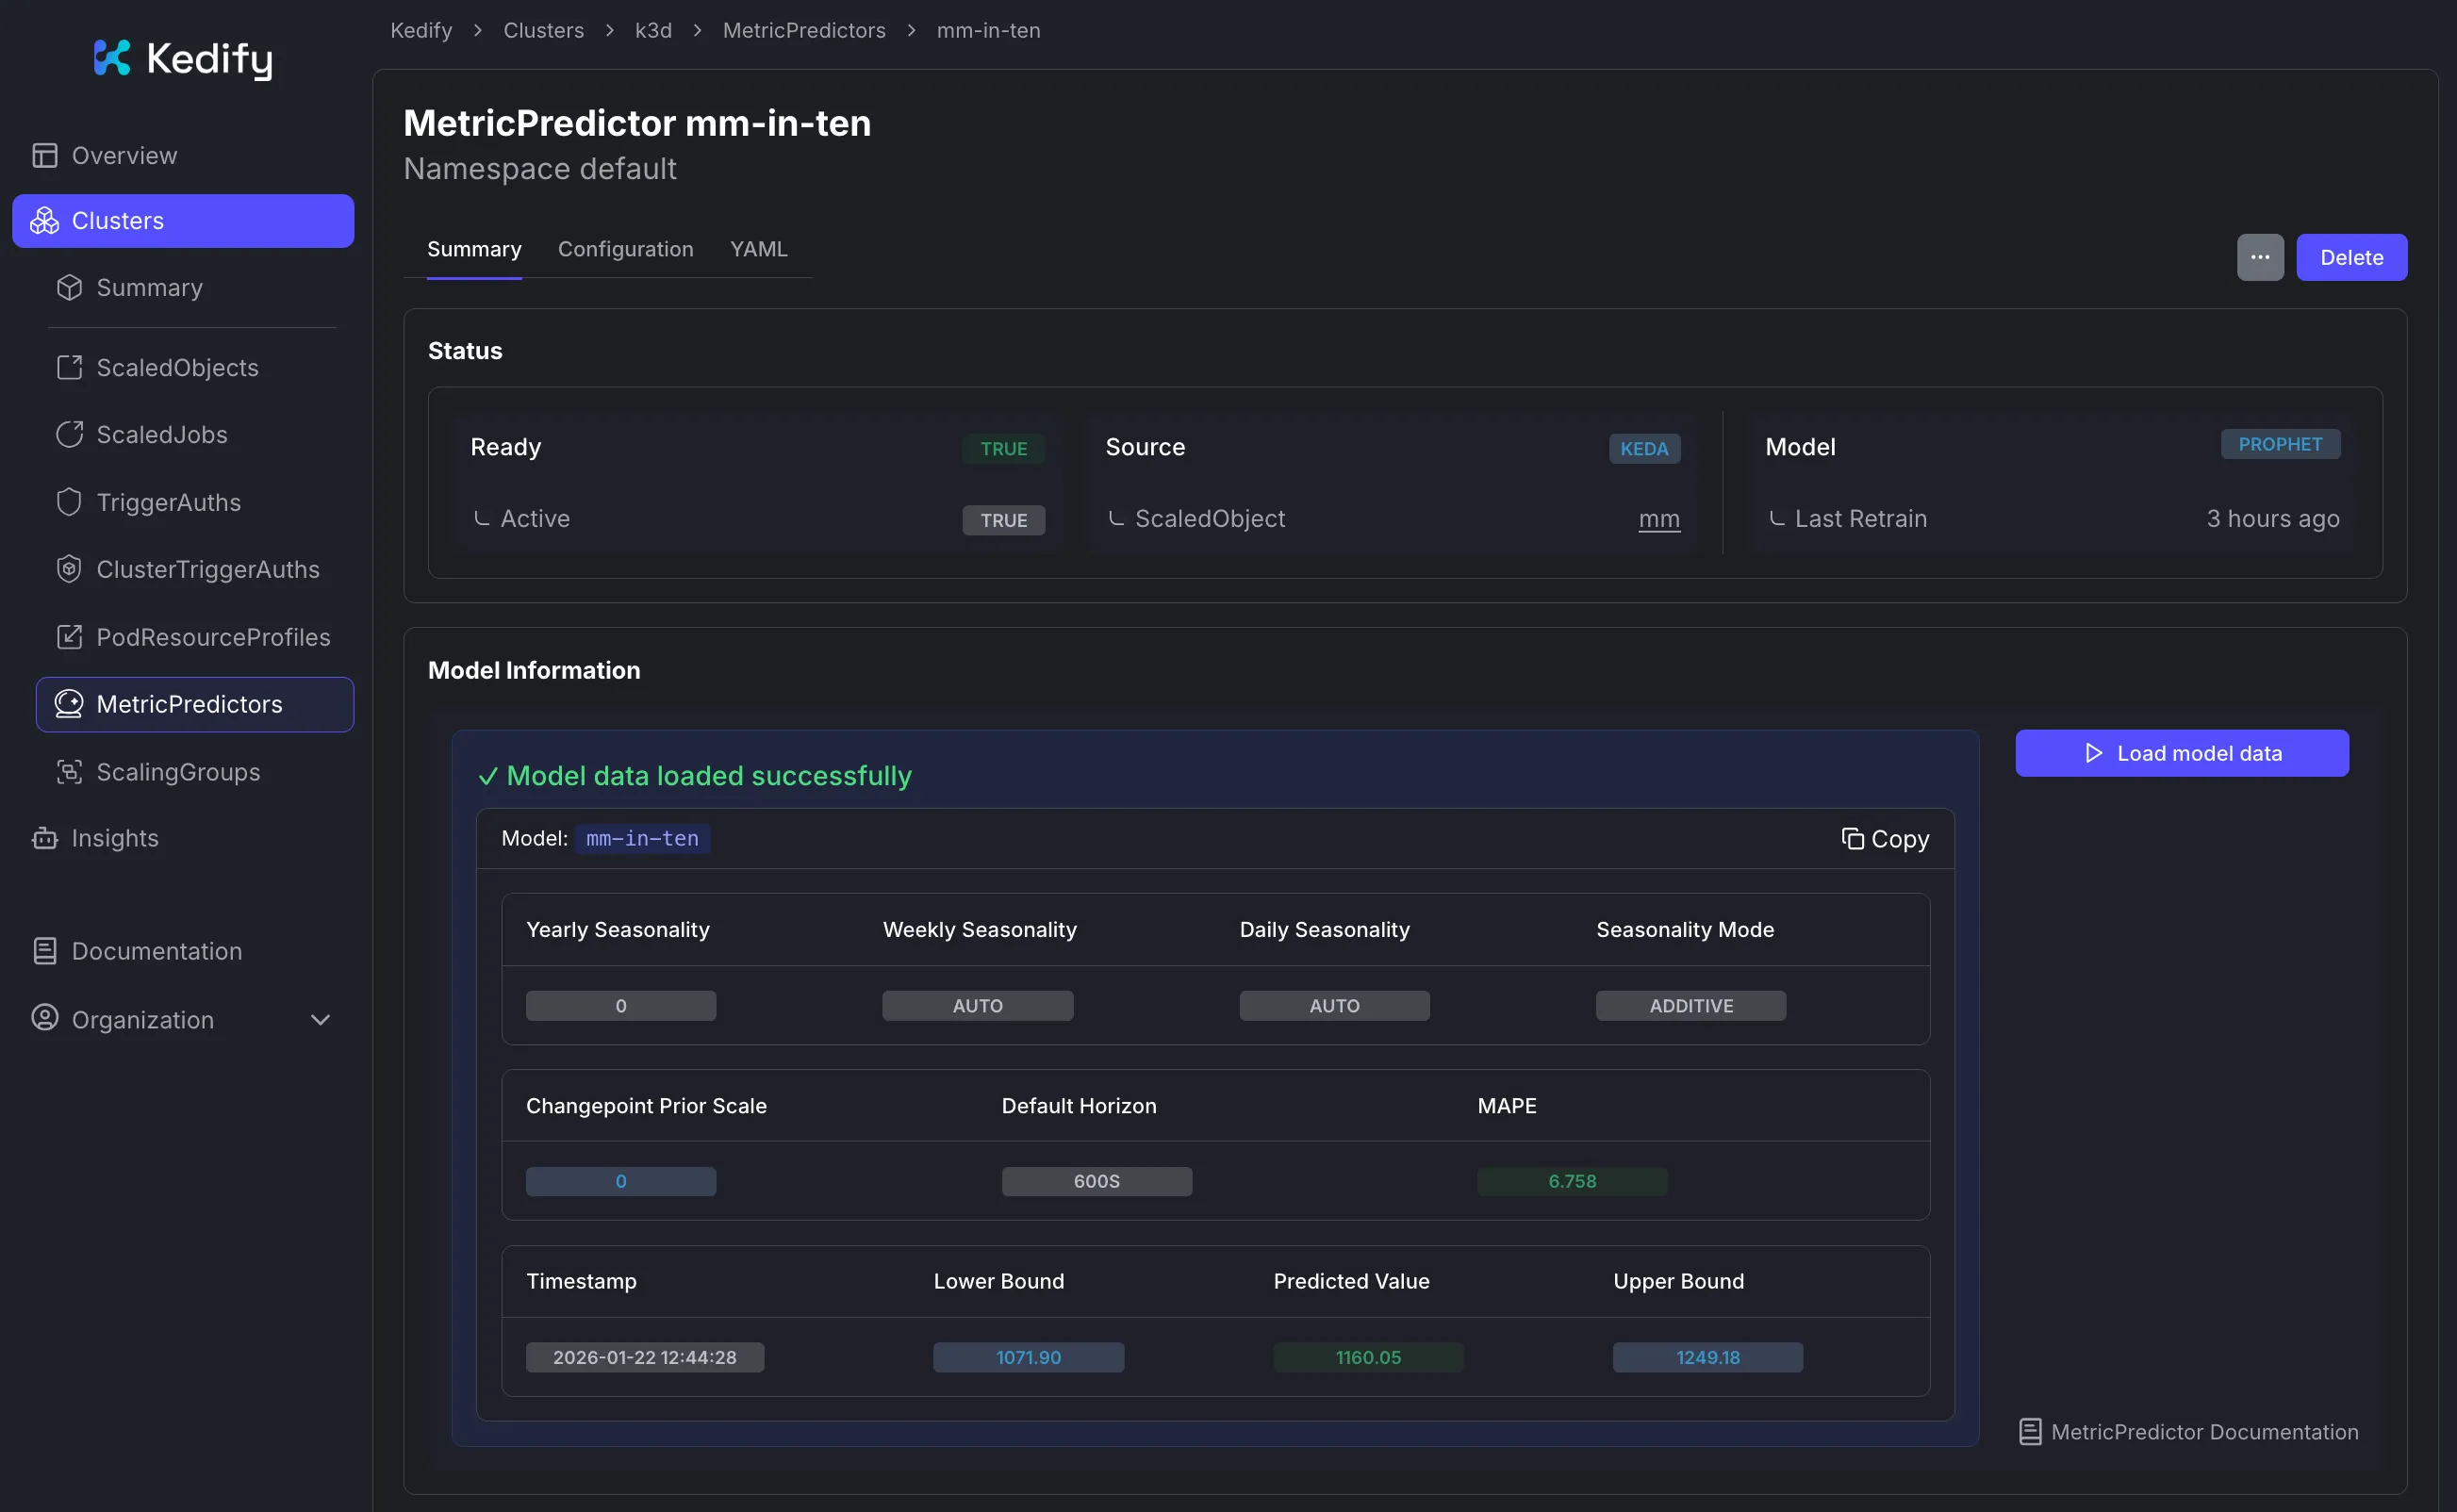
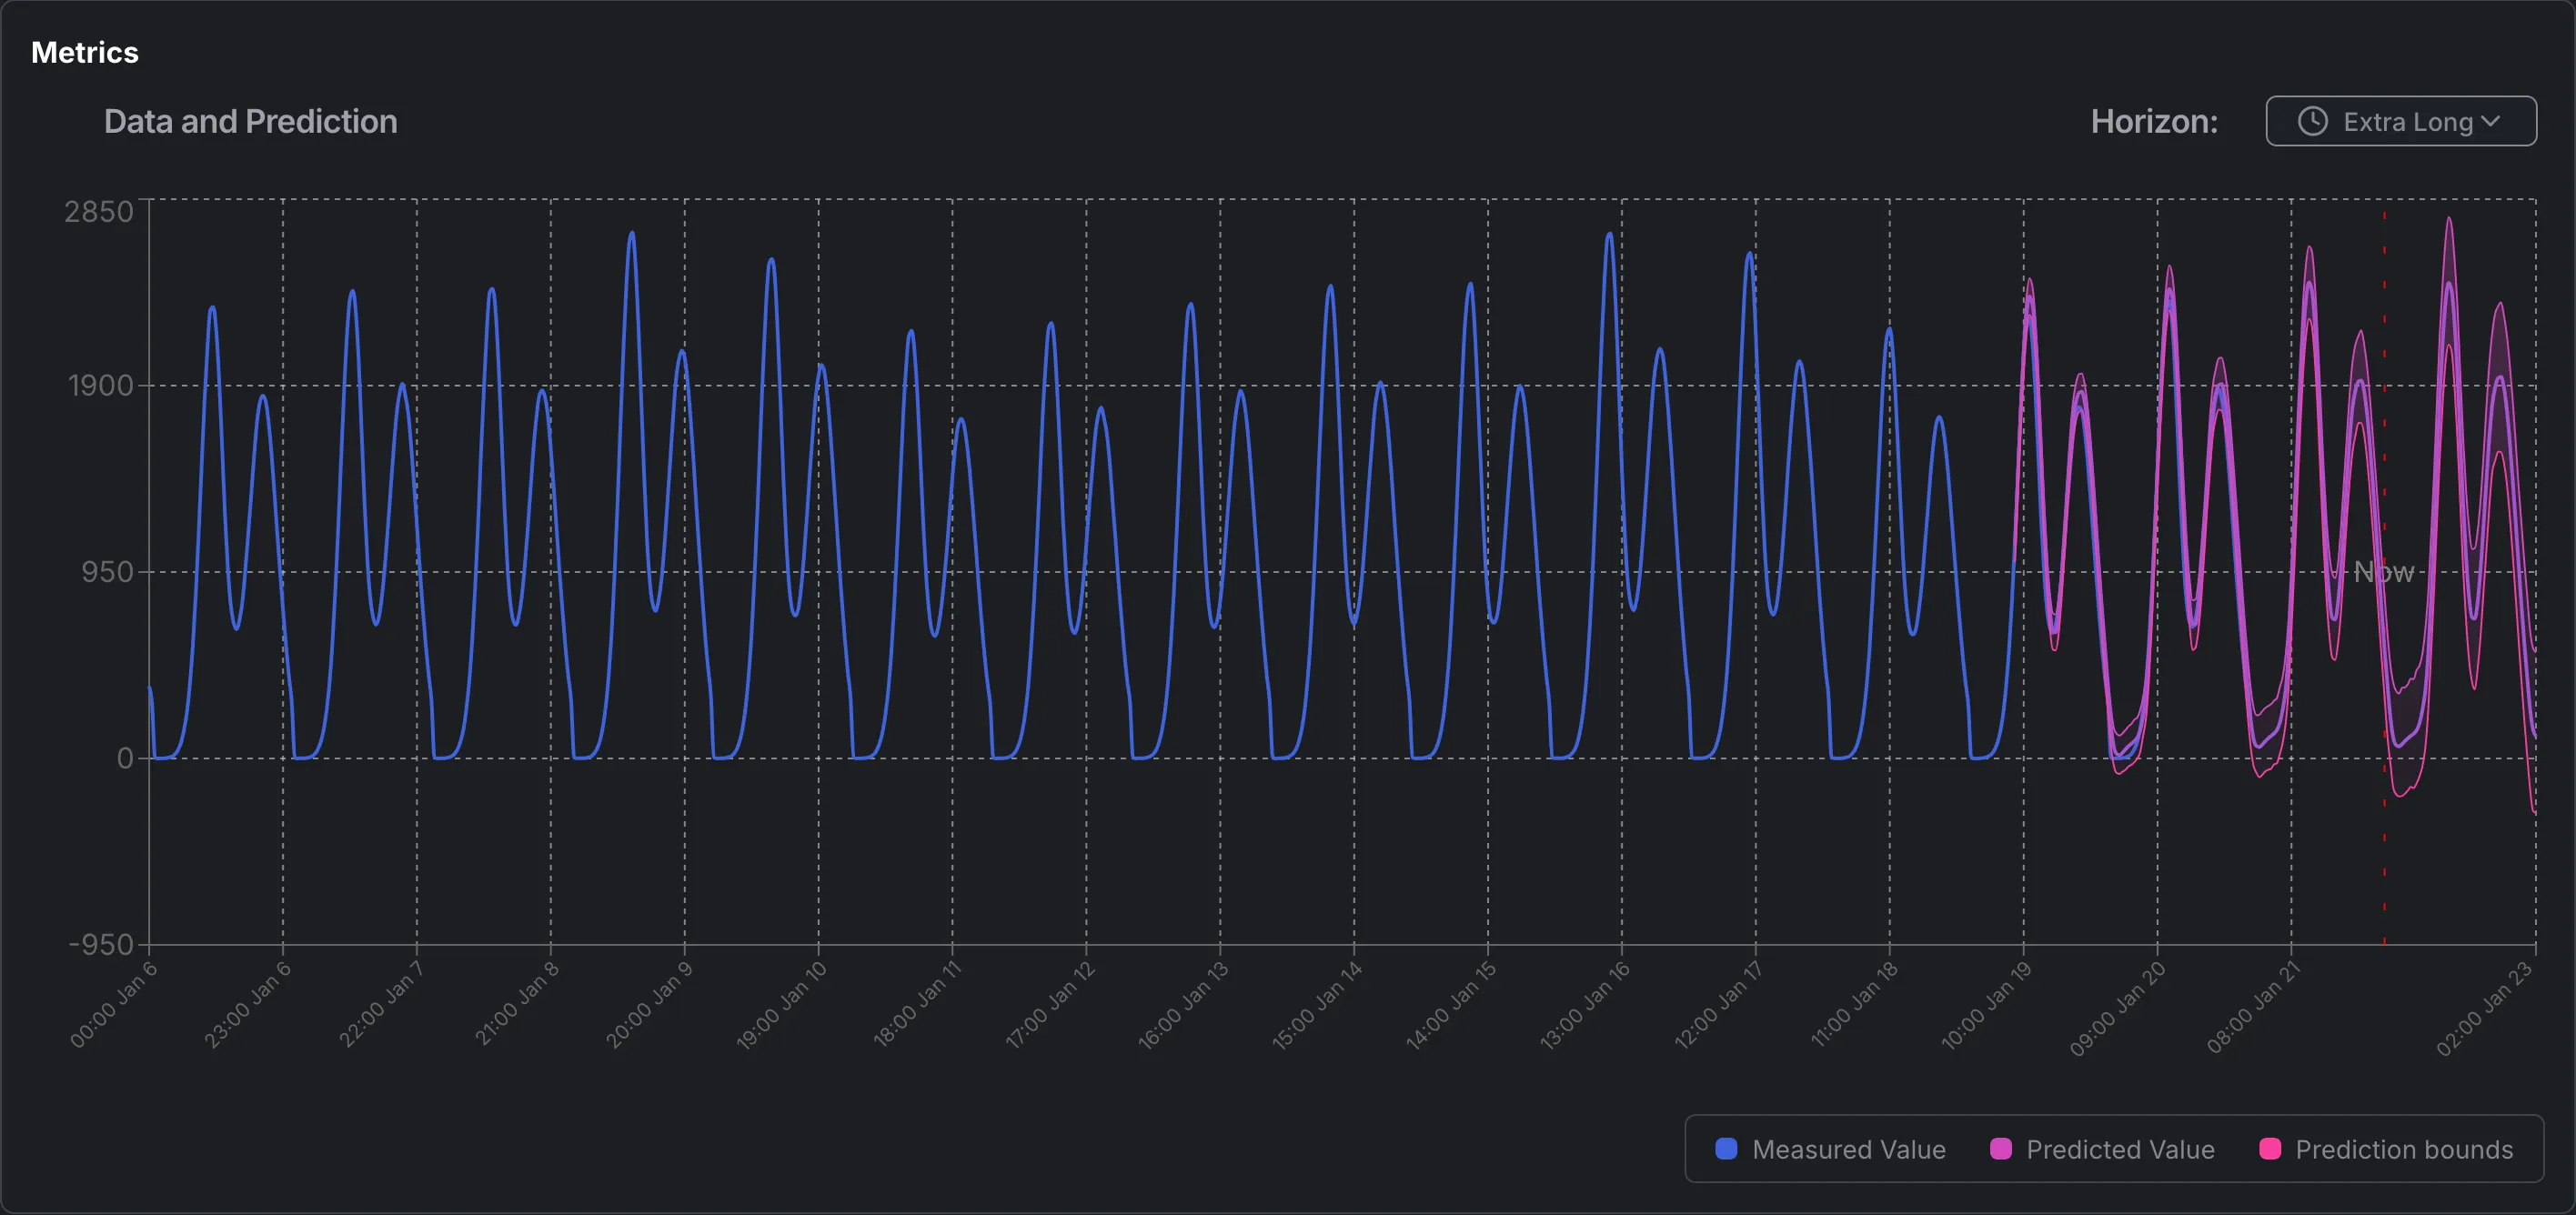
To see the historical data and predictive values side-by-side, you can view the graph in the dashboard:
REST API
Section titled “REST API”Alternatively, users can use the REST API directly. The REST API may also come handy when debugging the models or feeding the metrics from somewhere else.
In order to expose the REST API, run:
kubectl port-forward -n keda svc/kedify-predictor 8000open http://localhost:8000 # explore the Swagger API# or docs:open http://localhost:8000/redoc# to check a model and its future prediction (how it thinks that future will look like)open http://localhost:8000/models/app*e-shop/graph# to check the individual components of the predictionopen http://localhost:8000/models/app*e-shop/graphComponents