
Try HTTP autoscaling
The following quickstart guide will walk you through installing KEDA + Kedify in a k3d Kubernetes cluster and deploying a sample application to demonstrate how Kedify scales an application using HTTP requests.
Prerequisites
-
kubectlcommand line utility installed and accessible -
helmcommand line utility installed and accessible -
curlcommand line utility installed and accessible - k3d installed on the machine via
orbrew install k3dor using an installation method of your choice.curl -s https://raw.githubusercontent.com/rancher/k3d/main/install.sh | bash
Create a new k3d cluster
In order to try HTTP based autoscaling with our sample application, we need to create a cluster with properly configured ingress.
We can create a k3d cluster with port forwarding to the cluster's load balancer.
k3d cluster create --port "9080:80@loadbalancer"KEDA + Kedify Installation
Let's install KEDA + Kedify on your cluster! The following three steps will walk you through the basics. Installing the Kedify Agent will automatically install KEDA.
Step 1: Install with Helm
After Helm finishes, you should see the Kedify Agent and KEDA installed in your cluster.
kubectl get deployment -n keda -wThe Kedify Agent will be installed as the first step, then it will configure KEDA with HTTP Add-On in the same namespace and in a minute (once all images are pulled, based on your connection speed), the output should be similar to this:
NAME READY UP-TO-DATE AVAILABLE AGEkedify-agent 1/1 1 1 1mkeda-add-ons-http-interceptor 1/1 1 1 1mkeda-add-ons-http-controller-manager 1/1 1 1 1mkeda-add-ons-http-external-scaler 1/1 1 1 1mkeda-operator 1/1 1 1 1mkeda-operator-metrics-apiserver 1/1 1 1 1mkeda-admission-webhooks 1/1 1 1 1mStep 2: Autoscale Application
Run the following commands to deploy a sample application that responds to HTTP requests.
kubectl apply -f 'https://dashboard.kedify.io/public/files/sample_http_deployment.yaml'Confirm the application is deployed correctly.
kubectl get deployment -n default -wYou should see the following output:
NAME READY UP-TO-DATE AVAILABLE AGEhttp-demo-deployment 1/1 1 1 26sTest the application is working correctly
We are making an HTTP request to the application to confirm it is working correctly. The request is made to the `k3d` load balancer, which is listening on port 9080, we are using the host header to route the request to the correct service.
curl -I -H 'host: demo.keda' http://localhost:9080You should see the following output:
HTTP/1.1 200 OKContent-Length: 320Content-Type: text/htmlDate: Tue, 23 Jul 2024 22:27:59 GMTAdd ScaledObject
Run the following command to deploy a `ScaledObject` that will scale the application based on the number of HTTP requests.
kubectl apply -f 'https://dashboard.kedify.io/public/files/sample_http_scaledobject.yaml'Confirm the app is scaled to zero
Confirm the application has been scaled to zero and that Kedify Proxy is running correctly. The `ScaledObject` defined above tells KEDA to scale down to 0 when there is no HTTP traffic flowing to the application.
kubectl get deployment -n default -wYou should see the following output, app scaled to zero and Kedify Proxy up and running:
NAME READY UP-TO-DATE AVAILABLE AGEhttp-demo-deployment 0/0 0 0 12mkedify-proxy 1/1 1 1 35sStep 3: Monitor Autoscaling
Perform another HTTP request to test that the application is correctly scaled out and responds correctly.
curl -I -H 'host: demo.keda' http://localhost:9080You should see the following output:
HTTP/1.1 200 OKContent-Length: 320Content-Type: text/htmlDate: Tue, 23 Jul 2024 22:39:29 GMTServer: envoyX-Envoy-Upstream-Service-Time: 4103X-Keda-Http-Cold-Start: trueConfirm the application has been scaled out to handle the traffic.
kubectl get deployment -n defaultYou should see the following output:
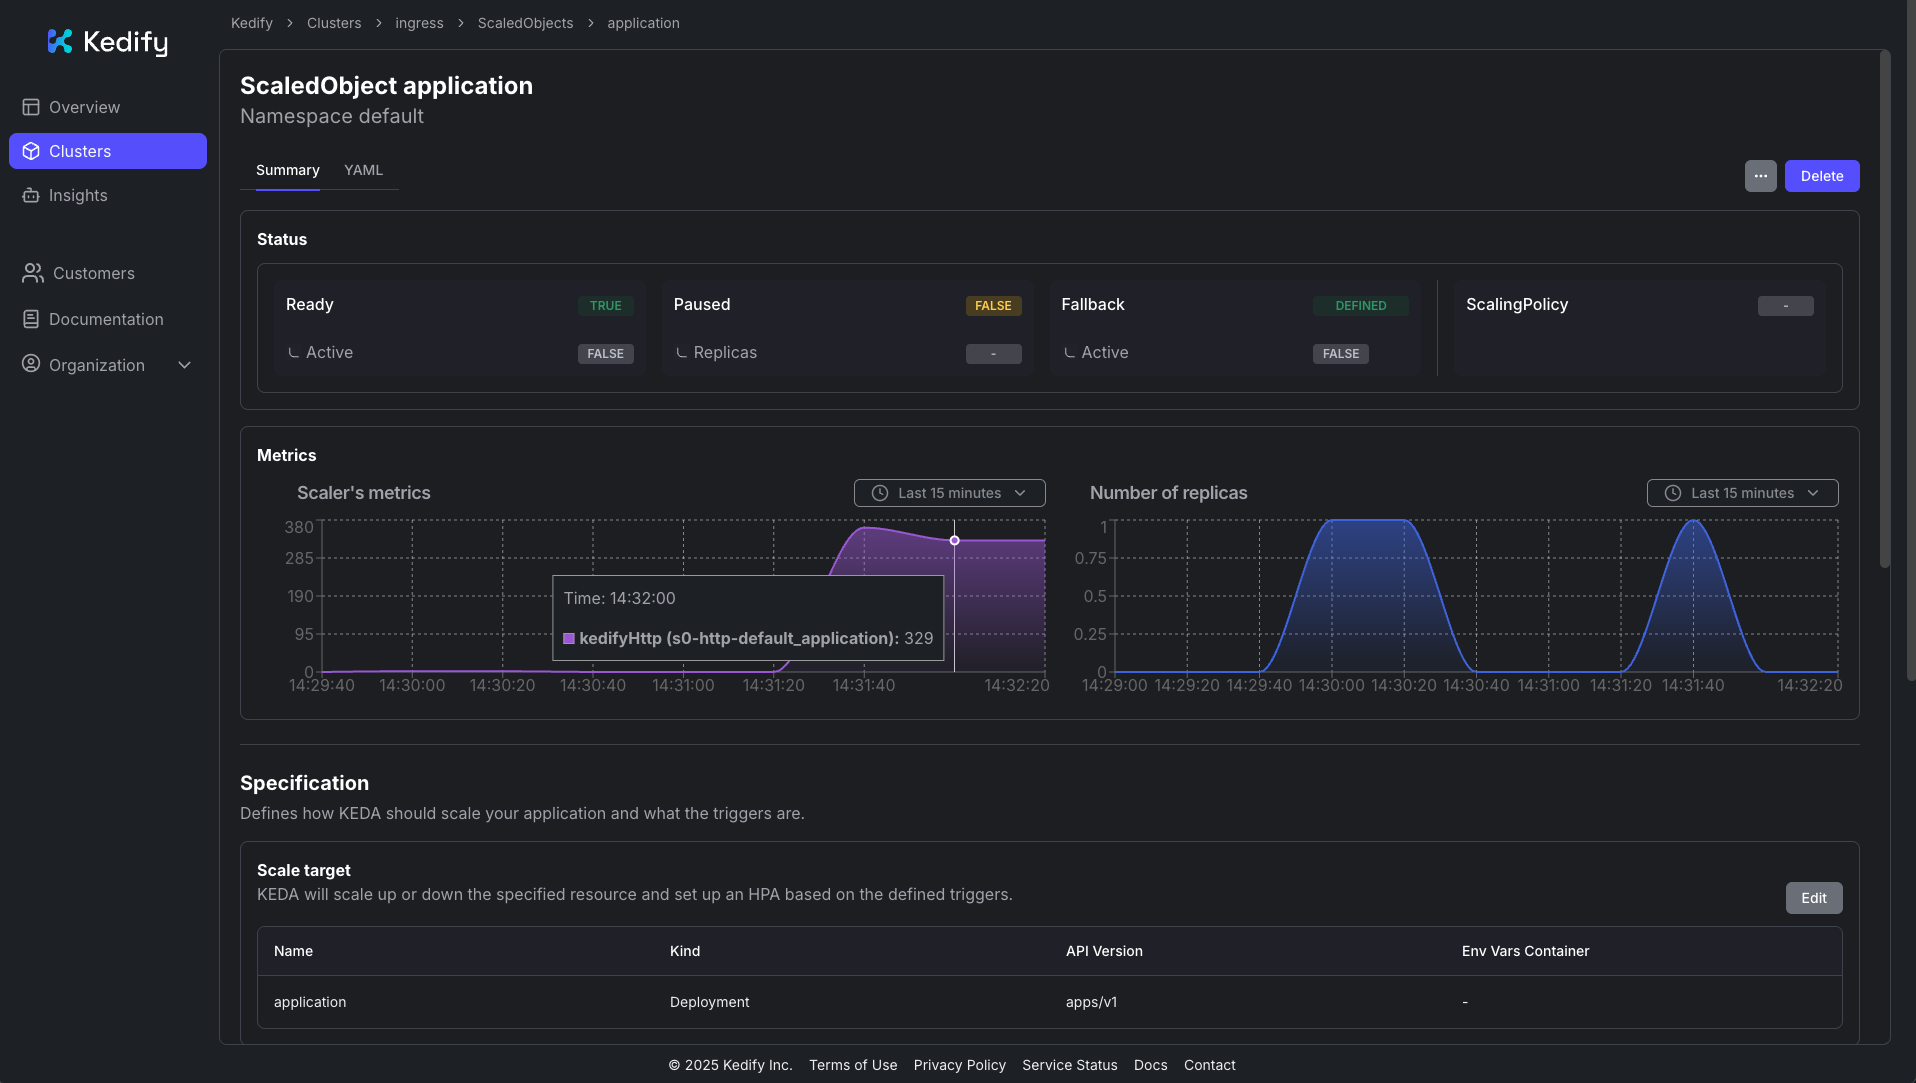
NAME READY UP-TO-DATE AVAILABLE AGEkedify-proxy 1/1 1 1 3m9shttp-demo-deployment 1/1 1 1 14mBy sending more requests you can see that the application is scaled out to a higher number of replicas.
Cleanup
Stop request generators and verify the demo returns to its configured idle replica count. The expected first result is a successful request after zero-to-one activation, followed by ready capacity under load. If that fails, inspect workload scaling before changing thresholds.
If you created the disposable default k3d cluster for this tutorial, confirm its name with k3d cluster list, then remove only that demo cluster with k3d cluster delete k3s-default. This deletes its workloads and data. For an existing cluster, remove only the demo manifests you applied through their owner.
Compare zero and warm capacity before applying the demo to a latency-sensitive service. For another traffic path, use the HTTP integration chooser.
Next Steps
- Review the Kedify Key Concepts
- Choose what to enable next from a measured workload need.
Related documentation
Choose: Scale to zero or keep warm capacity · Choose what to enable
Diagnose: Workload does not scale, or scales too slowly
Related capabilities: HTTP scaling