
Scale vLLM with OTel model metrics
Scale vLLM replicas from model metrics collected by an OpenTelemetry sidecar. This example uses vLLM 0.6.4 and OTel Add-on chart 0.1.4; metric names and model flags can differ in other releases.
Prerequisites: Kedify’s KEDA build, kubectl, Helm, a working cert-manager installation for the OTel admission webhook, model access on Hugging Face, and GPU nodes with a working device plugin. The storage commands below require a GKE CSI storage class that supports cloning a disk to ReadOnlyMany. On other storage systems, prepare a shared model volume with your provider’s procedure and adapt the claim name.
Install the collector before creating model pods
Section titled “Install the collector before creating model pods”Do not install a second OTel Operator if your cluster already has one. For an existing operator, keep otelOperator.enabled: false and verify that its admission webhook supports sidecar injection. Otherwise install the operator and collector with:
cat > otel-values.yaml <<'VALUES'otelOperator: enabled: true manager: env: ENABLE_WEBHOOKS: "true" admissionWebhooks: create: trueotelOperatorCrs: - enabled: true name: vllm-metrics mode: sidecar includeMetrics: [vllm:gpu_cache_usage_perc, vllm:num_requests_waiting]VALUEShelm upgrade --install kedify-otel-scaler oci://ghcr.io/kedify/charts/otel-add-on \ --version v0.1.4 --namespace default --values otel-values.yaml --waitkubectl get opentelemetrycollector vllm-metrics -n defaultkubectl get deployments -n defaultConfirm the operator is available before creating model pods. The named collector scrapes each pod’s :8080/metrics endpoint and exports to the scaler installed by this release. If model pods already exist, restart them after the collector is ready and verify that the new pods contain a collector container.
Step 1: Deploy the AI Workload With Static Number of Replicas
Section titled “Step 1: Deploy the AI Workload With Static Number of Replicas”If you want to use some other workload than LLM, feel free to continue directly with step 3. However, make sure that your application exposes the custom metrics on port :8080 or tweak the configuration of OpenTelemetry Collector to fit your use-case.
Data (weights of Neural network)
Section titled “Data (weights of Neural network)”This assumes the user to be familiar with HuggingFace and have a valid HF token.
# example of preparing PV & PVC with data on GKEkubectl apply -n default -f - <<EOFapiVersion: v1kind: PersistentVolumeClaimmetadata:  name: "models-pvc"spec:  storageClassName: csi-gce-pd  accessModes:    - ReadWriteOnce  resources:    requests:      storage: 20GiEOF
kubectl apply -n default -f - <<EOFapiVersion: v1kind: Podmetadata:  name: pvc-accessspec:  containers:    - name: main      image: python:3.12-slim      command: ["/bin/sh", "-ec", "sleep 15000"]      volumeMounts:        - name: models          mountPath: /mnt/models  volumes:    - name: models      persistentVolumeClaim:        claimName: models-pvcEOF
kubectl wait -n default --for=condition=Ready pod/pvc-access --timeout=120s# Open a shell in the download pod.kubectl exec -n default -ti pvc-access -- bash
# download the LLM (these commands should be run in the pod)python -m pip install "huggingface_hub[cli]==0.26.2"# Interactive login; use a token authorized for the selected model.huggingface-cli loginhuggingface-cli download meta-llama/Meta-Llama-3-8B-Instruct --exclude "*.bin" "*.pth" "*.gguf" ".gitattributes" --local-dir /mnt/models/llama3exit
If you have downloaded the llama 3 8B model before, you can just prepare the pv with this command instead:
# from the hostkubectl cp -n default llama3 pvc-access:/mnt/modelsStop the download pod to release its disk attachment, then clone the completed volume. The source and clone must use a storage class/CSI driver that supports this operation; replace csi-gce-pd with that class on both claims.
kubectl delete pod pvc-access -n defaultCreate the read-only clone:
kubectl apply -n default -f - <<EOFkind: PersistentVolumeClaimapiVersion: v1metadata: name: models-pvc-clonespec: dataSource: name: models-pvc kind: PersistentVolumeClaim accessModes: - ReadOnlyMany storageClassName: csi-gce-pd resources: requests: storage: 20GiEOFHardware
Section titled “Hardware”We assume the Kubernetes cluster has nodes with accelerators ready and device plugin has been successfully installed. Kedify is not opinionated about the accelerator’s vendor, however, if you happen to be using the NVIDIA accelerator, things can be much easier by using the gpu-operator. Otherwise, make sure the correct versions of drivers are installed, CUDA is present and corresponding device plugin is also running in the cluster.
Model Deployment
Section titled “Model Deployment”Save the following as llama.yaml. It requests one NVIDIA GPU per replica and uses half-precision weights (float16); this is not quantization. Verify memory capacity for your model and concurrency. The explicit collector annotation selects the sidecar created above.
apiVersion: apps/v1kind: Deploymentmetadata: name: llamaspec: selector: matchLabels: app: llama template: metadata: annotations: sidecar.opentelemetry.io/inject: "vllm-metrics" labels: app: llama spec: containers: - args: - --model=/mnt/models/llama3/ - --port=8080 - --served-model-name=llama3 - --load-format=safetensors - --kv-cache-dtype=auto - --guided-decoding-backend=outlines - --tensor-parallel-size=1 - --gpu-memory-utilization=0.99 - --max-num-batched-tokens=2048 - --max-model-len=2048 - --enable-auto-tool-choice - --tool-call-parser=llama3_json - --dtype=float16 image: docker.io/vllm/vllm-openai:v0.6.4 name: main volumeMounts: - mountPath: /mnt/models/ name: model readOnly: true resources: limits: cpu: "4" memory: 16Gi nvidia.com/gpu: "1" requests: cpu: "4" memory: 8Gi nvidia.com/gpu: "1" volumes: - name: model persistentVolumeClaim: claimName: models-pvc-clone readOnly: truekubectl apply -n default -f llama.yamlkubectl rollout status deployment/llama -n default --timeout=600skubectl get pods -n default -l app=llama -o jsonpath='{range .items[*]}{.metadata.name}{": "}{.spec.containers[*].name}{"\n"}{end}'Expect the model container and an injected collector. If the collector is missing, fix the operator/webhook, then run kubectl rollout restart deployment/llama -n default and repeat the checks. Investigate GPU scheduling or model-loading errors before enabling autoscaling.
Step 2: Verify That Model Works
Section titled “Step 2: Verify That Model Works”# first expose the svckubectl apply -n default -f - <<EOFapiVersion: v1kind: Servicemetadata: labels: app: llama name: llamaspec: ports: - port: 8080 selector: app: llamaEOFIn one terminal, keep kubectl port-forward -n default svc/llama 8080:8080 running. In another, verify the exported metric and send a request:
curl -fsS localhost:8080/metrics | grep -E 'vllm:(gpu_cache_usage_perc|num_requests_waiting)'curl -N -s -XPOST -H 'Content-Type: application/json' localhost:8080/v1/chat/completions \ -d '{ "model": "llama3", "messages": [ { "role": "user", "content": "Write me a poem about autoscaling." } ], "stream": true, "max_tokens": 300 }'Step 3: Set up Autoscaling
Section titled “Step 3: Set up Autoscaling”Confirm both vLLM metric names and the model_name label in the previous output. Inspect the collector and scaler before creating a ScaledObject:
kubectl get opentelemetrycollector vllm-metrics -n default -o yamlkubectl logs -n default deployment/kedify-otel-scaler --tail=100The collector forwards the selected metrics to the scaler. The query below averages samples over the retention window and sums matching pod series. targetValue: "0.25" is an example cache-utilization target, not a universal setting. A missing or stale series must not be mistaken for spare capacity; see missing metrics and retention.
Step 4: Create ScaledObject for KEDA
Section titled “Step 4: Create ScaledObject for KEDA”apiVersion: keda.sh/v1alpha1kind: ScaledObjectmetadata: name: modelspec: scaleTargetRef: apiVersion: apps/v1 kind: Deployment name: llama triggers: - type: kedify-otel metadata: scalerAddress: "kedify-otel-scaler.default.svc:4318" metricQuery: "sum(vllm:gpu_cache_usage_perc{model_name=llama3,deployment=llama})" operationOverTime: "avg" targetValue: "0.25" minReplicaCount: 1 maxReplicaCount: 4The overall architecture then looks like this.
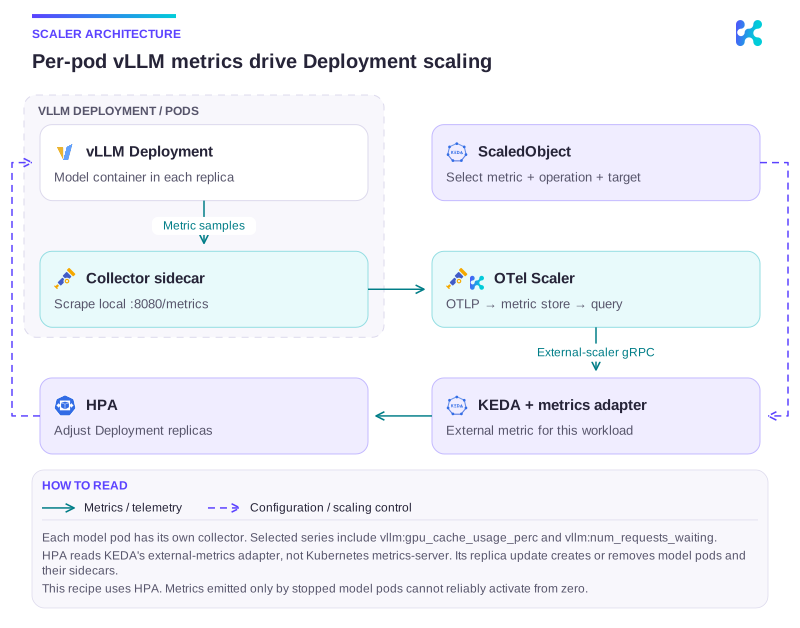
Diagram description
Each vLLM pod has an injected OTel Collector sidecar scraping its local :8080/metrics endpoint. The sidecars export selected GPU-cache and waiting-request metrics over OTLP to the OTel scaler's short-term store. A ScaledObject supplies the metric query and target. KEDA reads the scaler and exposes external metrics through its adapter to HPA, which updates the vLLM Deployment replica count.
Save the ScaledObject as scaledobject.yaml, then apply it:
kubectl apply -n default -f scaledobject.yamlkubectl get scaledobject model -n default -o yamlkubectl get hpa,pods -n defaultkubectl get events -n default --sort-by=.lastTimestampGenerate bounded concurrent inference requests through your serving route; a port-forward selects one pod and is suitable for checking a response, not benchmarking load distribution. Verify that the external metric changes, desired replicas increase and added pods become ready. After stopping load, verify scale-down to the one-replica floor. Tune the target against latency and queueing, not GPU utilization alone.
Next steps
Section titled “Next steps”This example scales model pods, not GPU nodes. Pending replicas need available device capacity; use your provider’s node provisioning mechanism or the custom target and node-capacity guides for an applicable integration. Do not scale GPU nodes to zero using only telemetry emitted by those same stopped model pods.
To remove this experiment, delete its ScaledObject and model Deployment, then the example Service and collector configuration. Keep the downloaded model PVCs until you have decided whether their data is still needed. Do not remove a shared OTel Operator or an existing scaler release.
Continue with this topic
Section titled “Continue with this topic”Reference: OTel scaler configuration.
Diagnose: Inference pods are pending or requests are slow.
Related capabilities: OpenTelemetry metric scaling.